Wednesday 28 December 2016

NEW SPRING/ SUMMER AND SALE A BRATION CATALOGUE IS NEARLY HERE!!!


4th January marks the launch of the New catalogue and sale a bration promotion. 

If you don't already have a demonstrator and would like a FREE catalogue just leave a comment or message me for further details.

Sale a bration is the time of the year that for every £45 you spend you get to choose a FREE product from the sale a bration brochure...WOW!!

This is also a great time to join the Stampin Up team. You don have to do a blog, YouTube tutorials or classes o any kind if you don't want too. Most people join purely for the insant 20% discount! As I did.
You get to pick your OWN starter kit ( so only get the products you want) to the value of £130 and only pay £99! Instant saving from day one!!
If this isn't good enough....during sale a bration you also get to choose ANY TWO FREE STAMP SETS of your choice...WOW!!

If any of you crafters think this is the offer for you then please feel free to contact me and I'll help you every step of the way...I'd love to have you join my team!! 

Happy crafting

Steffi xxx

Cool treats sneak peek


Hi everyone

I hope you have all had a fantastic christmas with family and friends!
I just want to share with you a sneak peek of the cool treats stamp set and matching frozen treats dies from the upcoming spring/ summer catalogue that launches to you all on 4th January! I also used the coordinating DSP from the same suite.

I think this project looks so cute hope you like it too.


What you will need to create this project:

Cool treats stamp set
Frozen treats framelits dies
Tasty treats speciality DSP
Watermelon wonder ink pad
Crumb cake ink pad
Earl espresso ink pad
Peekaboo peach card measuring 12" × 7 1/2"
Scrap of whisper white (for label and to stamp the lolly)
Decorative label punch
Early espresso ribbon (mine is from the clearance rack)

Take the peekaboo peach card and score on the long side at 1/2", 3 1/2", 6 1/4" & 9 1/4"
Score on the short side at 3/4", 3 1/2" & 5 1/2"
Cut away parts as shown below

Then prepare your desired DSP as follows 
2 pieces measuring 2 3/4" × 1 3/4"
2 pieces measuring 2 1/2" × 1 3/4"
1 piece measuring 2 3/4" × 2 1/2"
I find it easier to adhere this to the box before putting it together but its all down to personal choice really.
Then assemble the box.

If you have not yet got a demonstrator and would like a FREE copy of the New catalogue just drop me a message and I'll happily send one out to you. Don't forget that 4th January also is the start of our sale a bration! For every £45 you spend you can choose a FREE ITEM from the sale a bration brochure!! Amazing deal. 
If you like crafting and are considering signing up to Stampin Up...now is the best time to do it. Many people sign up purely for the instant 20% discount as I did. You don't need to keep a blog or do YouTube tutorials if you don't want to. 
When you join you get to pick your own starter kit to the value of £130 and only pay £99!! Also during sale a bration you also get to choose ANY TWO FREE STAMP SETS from any off our current catalogues. 

If you are interested in joining then either click the link at the top of the page or contact me direct and I'll help you.

Thanks for reading and happy crafting 

Steffi xxx


Sunday 11 December 2016

Candy cane lane suite crafty afternoon


Hi everyone

I hope you have all had an amaZing weekend. 
I've finally nearly finished my christmas shopping.....I'm so far behind its silly. 
I thought I best get my finger out and actually start my Xmas cards!!

Above are a couple of ideas I came up with....I did do another 3 designs but I forgot to take pictures before I wrote them out and sealed them. Does any of you do things like that? I'm terrible haha.

Most of the products I have used are from the candy cane lane suite with the exception of the doiles and the merry christmas stamp (which was from the snow place stamp set).

If you would like some of the items I've used they are all available from my online shop...link is in above tab.

I've got a busy week at work ahead but I'll get back here when I can.

Happy crafting

Love Steffi xxx


Sunday 4 December 2016

Kinda eclectic card


Morning everyone I hope you're all having a fab day!
I'm going to a kid's Christmas party today.....think I'm more excited than the kid's haha.

Anyway I just wanted to share with you this beautiful card I created. I have sent this to a lovely lady who placed an order with me along with a sweet treat to say thanks.

Here is a list of what I used

Basic black card measuring 11 3/4" x 4 1/4" fold in half to create a tent fold card base and another piece measuring 5" x 3 1/2"
Whisper white card measuring 5 1/2" x 4" and another piece measuring 4 3/4" x 3 1/4"
Island indigo card measuring 5 1/4 x 3 3/4"
Kinds eclectic stamp set
Perpetual birthday stamp set
Island indigo ink
Memento black ink
Elegant butterfly punch
Blossom bunch punch
Scraps of black card for butterfly and flowers 
Rhinestones 

I hope both my customer and all you guys like what I've come up with.

If you would like to order any of the supplies then just click on the shop now tab and it will take you straight to my online shop. If you would like to request a FREE catalogue just drop me a message.

Hope you all have a great day.
Happy crafting

Love  Steffi xxx


Thursday 1 December 2016

DECEMBER HOSTESS CODE

Hi everyone

The new hostess code for December is here...KZSK4ENS. 
Please remember for all orders under £150 to enter the hostess code before delivery. This will enter you into my rewards club and will entitle you to free goodies from myself at the end of the month!!

If your order is over £150 then DON'T enter the hostess code as you will earn your own rewards!!

Any questions please don't hesitate to contact me.

Happy crafting

Steffi xxx

Wednesday 30 November 2016

END OF YEAR CLOSEOUT SALE!!!!!


Hi everyone
Sorry it's been so long since my last post on here. I've been dealing with a few personal things and have been struggling with inspiration.
I want to let you all know about the HUGE END OF YEAR SALE by Stampin' Up.....loads of items with up to a MASSIVE 60% OFF!!! This sale starts tomorrow and I'm so excited to see what items are on there.
I personally love a bargain and this sale is definately sure to have so many. So if you're anything like me then head over tomorrow and check it out!! 
Click on the SHOP NOW button on my page to take you straight there. Also look for the new hostess code  that I'm about to set up. Enter this code to enter you into my rewards club which ends at the end of the month, this enables you to receive some free goodies from myself!!

Being an Independant Demonstrator with Stampin' Up is so fantastic. I've met loads of nice people who share my love of everything crafty, then there is the instant 20% discount on all products from the catalogue. Anyone wanting more information on this then please don't hesitate to ask.

Thanks for reading and happy crafting.

Love Steffi xxx

Sunday 6 November 2016

Candy Cane Lane Advent Calendar


HI everyone
I want to share with you this project today...I got asked by my sister and her girlfriend if I would make them an advent calendar for their 1st xmas together in their house.

I must admit this has been a labour of love and I've been on about a day and a half making it. Most of that was alot of prepping card and layers of dsp. I wanted to co ordinate it with the countdown to xmas project I done about a week ago.

It's constructed with 2 x2" boxes and then glued together and I used red double sided tape to stack them for extra strength. 
I love how it turned out...almost to the point I didn't want to give it to my sister haha.

Hope you all like it too. Please find below a list of supplies that I used to make it.
whisper white cardstock
candy cane lane DSP
early espresso cardstock
real red cardstock
cookie cutter stamp set
cookie cutter punch
starlight thinlets
1" circle punch
real red striped ribbon (was on clearance rack)
iced rhinestones (was on clearance rack)

If you have any questions or would like to receive a FREE catalogue please don't hesitate to contact me.

Happy crafting and catch ya later

Steffi xxx

Tuesday 1 November 2016

Crafty projects from today

Hi everyone

Hope you are all well. I've had a day off from work today...so my intention was to get alsorts of crafty projects done. I started off well and I made the two custom sized boxes below.


After I had done these I suddenly couldn't think of anything to do, I tried plodding on and done a xmas card but I just didn't like it at all. I think as I'm normally at work I want to do as much as I can when I'm off. It was really frustrating for me.

Anyway I decided to go and look at some of my 'upline' and good friend's youtube channel...annshappystampers. I decided to do a couple of her tutorials and ended up making the things below. I love how they turned out and her tutorials are so easy to follow. If you have not seen any I definately recommend going to check out her blog and youtube channel.


The 1st picture is her tutorial for the vellum bag in a box and the 2nd one is her vellum cracker box.

Hope you like what you see today.
Happy crafting and catch ya later
 Steffi xxx


NEW STITCHED SHAPES FRAMELITS AND DISCOUNTED STAMP SETS


Hi everyone just a quick post to share with you this fantastic offer!! you can now purchase these fabulous stitched shapes framelits...I can't wait to get mine.
Also there is a selection of stamp sets with a HUGE 25% discount...get yours today.
This offer is available from TODAY until 30th November.
If anyone would like a catalogue please contact me and I'll happily send you one out.

Happy crafting and catch ya all later
Steffi xxx

Saturday 29 October 2016

DSP SALE ENDS IN TWO DAYS!!!!


Hi everyone

Just a quick post to remind you that this fantastic offer ends in TWO days!!!
If you want to take advantage of this offer just click the shop now tab on my blog.
Please remember though if your order comes to less than £150 please enter my hostess code before checkout to enter into the rewards club.
Any question
Happy crafting
Steffi xxx

Friday 28 October 2016

Christmas countdown using Candy Cane Lane DSP

Hi everyone
I hope you are all enjoying your Friday! Start of the weekend for most of you I would imagine....not for me through, I've got a full weekend at work to look forward to haha.

It's only 60 sleeps until Santa comes!! Wow where has the time gone?? I love everything about Christmas and this project reflects that.
I'm super excited to how it's turned out....I LOVE IT! hope you all do to.


I've wanted to do this project for a couple of weeks now and finally today I made time to do it.
Here is a list of the products I used:

Candy cane lane DSP
Whisper white cardstock
Early espresso cardstock
Real red ink pad
Red foil sheets
Number of years stamp set
Bow builder punch
Starlight thinlets dies
Tombow
Diamensionals
Iced rhinestones ( from the clearance rack...if there's any left)

To make the bottom box you will need to:
2 pieces of whisper white cardstock measuring 9 1/2 x 5 3/4"(one for the bottom and one for the lid), cut a smidge off two sides of one of the pieces (making sure that the two sides you trim share the same corner)
score all sides at 1" then fold and burnish and assemble how you would any other box. You will need 1 piece of DSP measuring 7 1/4 x 3 1/2" for the top of the box and 1 piece measuring 7 1/4 x 3/4" and 2 pieces measuring 3 1/2 x 3/4"


To make the cubes you will need to:
2 pieces of whisper white cardstock measuring 8 1/4 x 11 1/2". Score on the long side at 2 3/3, 5 1/2, 8 1/4 and 11". score on the short side at 2 3/4 and 5 1/2". Cut as per picture below.


You will need 12 pieces of cardstock measuring 2 5/8 x 2 5/8" and 12 pieces of DSP measuring 2 1/2 x 2 1/2" to decorate the sides.

For the tree part I used the back board from a pack of my DSP and just covered it and cut it to size, I think the thick whisper white cardstock would work just as well.

Hope you all love this project as much as I do. I had so much fun making it.

Happy crafting and catch ya all later.
Steffi xxxx

Wednesday 26 October 2016

Beautifully coordinated goodies made for a dear friend


Hi everyone
I made the above goodies for a very dear friend of mine, to thank her for her unwavering support and amazing friendship.
I decided on these colours as they are her absolute favorite. I love how they all turned out. Here is allist of what I used:
Paisleys and posies stamp set
Blooms and Wishes stamp set
Floral Boutique DSP
Bow builder punch
Decorative label punch
whisper white thick bakers twine
Night of navy ink pad
Night of navy and Whisper white cardstock
Iced rhinestones (from the clearance rack)
I also used a cheap notebook I purchased from Wilkinsons for 18p and covered it so it all matches.

I think these goodies show how everything from Stampin Up coordinates so beautifully!
Also this DSP is currently on the buy 3 get 1 FREE only until 31st of this month...so if you have not ordered yours yet...why wait??
If you would like to order any of these items please feel free toclick on the shop now button at the top of the page and don't forget to enter the hostess code if your order is under £150 to be entered into my rewards club.

Happy crafting and catch ya later

Steffi xxx

Monday 24 October 2016

Presents and Pinecones DSP

Hi everyone
Just a quick little post today. I  want to share with you the beautiful 'presents and pinecones' DSP available from Stampin up! This DSP is currently on the buy 3 get 1 free offer too!!

I hope you like my projects and agree that it showcases this paper beautifully.


If anyone would like to purchase this paper while it's on offer please just click on the 'shop now' tab at the top of my page. 
Remember if your order is less than £150 enter my rewards code to earn yourself goodies at the end of the month.
Happy crafting and catch ya all later,
Steffi xxx

Sunday 23 October 2016

Candy Cane Lane cracker top box

Hi everyone
I hope you are all well. I've had a hectic week at work...yesterday was my 1st chance to craft in a week!!
I don't know about you all but I get withdrawal symptoms hahaha.

This project I'm sharing with you all today is something I've seen a few people on facebook and youtube do, I loved it and so thought I'd give it a try.
I'm so pleased with how it turned out, I hope you guys like it too.


For this project I used:

Real Red cardstock measuring 12 x 12" and another piece at 2 x 4"
Candy Cane Lane DSP 4 pieces measuring 6 1/8 x 2 5/8" and 4 pieces measuring 1 1/2 x 2 5/8"
Scrap of Whisper White cardstock measuring 3 x 1 3/4"
Natural trim ribbon
Cookie cutter christmas stamp set
Cookie cutter punch
Tin of tags stamp set
Scalloped tag punch
Envelope punch board
Metallic enamel shapes
Real red ink pad
Crumb cake ink pad
Early espresso ink pad

1. On one side of the 12 x 12 cardstock...score at 2 7/8, 5 3/4, 8 5/8, 11 1/2" then rotate the card 90 degrees and score at 2 7/8". Rotate the card 180 degrees and score at 1 3/4, 2 1/4 and 2 3/4"
2. cut away thin rectangle and punch on the score lines (as pic below) line your card in the envelope punch board at 2 1/4" with every punch you need to do.

3. Attach your panels of DSP and then when burnishing the 3 little score lines at the top where you have punched. Remember that they need to be folded as follows...starting with the top one..towards you, 2nd away from you and 3rd towards you.
4. Apply adhesive of choice on the thin skinny strip and construct as you would any other box.
5. Make your tag using the little pieces of card and scalloped tag punch then thread the ribbon through and tie around the box as desired.

Hope you all like this project and I look forward to seeing some of you rcreations.
If anyone would like a FREE catalogue...drop me a message and I'll happily post one out to you.

Happy crafting and I'll catch ya later.
Steffi xxx


Saturday 15 October 2016

OCTOBER HOSTESS CODE

Hi guys
Here is the new hostess code for this month. If you order anything through me on the website under £150 use this code below to be entered into my rewards scheme. DON'T use this code if you order over £150 as then you will become the hostess and earn the rewards direct.

NZ2RHAPH

Catch ya all later
Steffi xxx

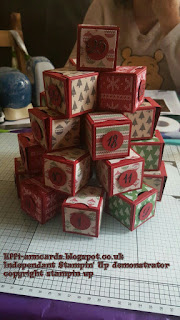
Warmth and cheer Advent Tree Calendar


Hi everyone 
I hope you are all well. It's been a bit miserable today so instead of going out shopping I decided to get my craft stuff out instead.
This is my project today and let me tell you it's been a labour of love...been on for at least 3 - 4 hrs haha.
The individual boxes measure 1 3/4" square when constructed. I've decorated it using the Warmth and Cheer DSP that is available from the Autumn/ Winter catalogue.
I must admit it's not my favorite project, I wish it had turned out better! I guess though for my 1st attempt it's not too bad.
This is not my original idea...I followed  the tutorial from Melissa's Kre8tions on youtube.
Hope you all enjoy the rest of your day.
Catch ya later
Steffi xxx

Sunday 9 October 2016

DESIGNER SERIES PAPER SALE!!!


Hi guys
just a quick post to let you all know about this fantastic sale! Buy 3 packs of the DSP listed above and choose 1 pack for FREE!!

Hope you take advantage of this amazing offer....I definately will be!

Catch you all later
Steffi xxx

Candy Cane Lane Suite

Hi everyone

I've had a busy day crafting today and I just wanted to share with you what I have made. I wont be posting instructions for each project but if any of you are interested just drop me a message and I'll gladly share with you.

The Candy Cane Lane suite that I have used is one of my favorites from the autumn/ winter catalogue...soooo adorable.
I hope you love the pics below as much as I enjoyed making them.

This box when finished measures 9" tall, 2 7/8" wide and deep

These cards measure 5 x 5"

The biggest box measures 7" long, 5" wide and 2" deep. The second box measures 6 1/4" long, 3 1/4" wide and 1 5/8" deep.

I'm sure you will agree that the quality of these products look simply stunning!! I'll post pics of the products and order numbers below so you can see what I have used.


If you would like to order through me either look for me on the demonstrator finder on Stampin up website ( Steph Stoker from Sunderland) or drop me an email if you want to request a FREE CATALOGUE!!

Happy crafting
Steffi xxx


My Stampin Up journey

Good morning everyone
Hope you are all well. It's been a while since I've posted on here now...I've just been away for2 weeks in the lovely sunshine. It was amazing.
Today's post isn't a project but I wanted to share with you all my Stampin Up journey so far...so here goes.


Hi everyone my name is Steph (or Steffi to friends) and i'm an independant Stampin Up demonstrator.
I've been papercrafting now for just over 4 years...it's thanks to my mam how obsessed I am now haha
Over the years I found a great deal of amazing products from a varied range of companies but never once did I stick to one companies products to producea card.
Earlier this year I saw that an old friend (whom I'd lost contact with after moving to Sunderland) set upa facebook page all about papercrafting. I was instantly intrigued and wanted to know more!
I placed a couple of orders with her beforedeciding to join myself with her as my 'upline'. Everyone who knows me will tell you that if I can find a bargain then I'm happy haha
It was in June that I decided to join...£130 worth of product for only £99!! even better that I could choose exactly what I wanted and not a prearranged bundle. Also at the time there was a great offer of picking ANY 2 FREE STAMP SETS!! WOWZERS!!
Initially I was worried whether I had it in me to only use product from one company....honestly though Stampoin Up make it so easy as everything coordinates perfectly and are fantastic quality. Now I can't remember the last timei used anything non Stamoin Up.
Everyone on our group pages on facebook and the whole crafting cliche in general are so supportive and always there to give advice when needed.
If anyone would like to know more about hoe to order or  to request a FREE CATALOGUE please don't hesitate to contact me.
Happy crafting everyone

Steffi aka Effi-anncards

Tuesday 13 September 2016

SEPTEMBER HOSTESS CODE!!

Hi guys
If any of you order through me and spend under £150 please enter the hostess code below. This will enter you into my rewards club which means FREE goodies when I close the code down in 30 days. To locate me on the demonstrator finder search Steph Stoker 🖒

Hostess code XYVMEPJY
Any questions don't hesitate to ask.
Happy crafting and catch ya all soon.
Steffi xxx

NEW CLEARANCE RACK ITEMS


Hi guys
Just another quickie post...new items in the clearance rack. Get yourself a bargain while stocks last!!!
I've already put my order in....have you? Haha

Catch ya later 
Steffi xxx

Cute cookie cutter note card sets


Hi guys 
Just had to share these super cute note card sets I've made for customers.
I love these so much and they were really easy to do.
here is what you will need 
Crumb cake note cards and envelopes 
Real red card measuring 4 3/4" x 3 1/4"
Candy cane Lane dsp measuring 4 1/2" x 3"
Real red card measuring 4 1/4" x 2 3/4"
Whisper white card measuring 4" x 2 1/2"
Scraps of whisper white for the gingerbread men and the sentiment 
Scrap of real red for bows and sentiment strip 
Cookie cutter stamp set and punch bundle 
Crumb cake ink 
Real red ink 
Metallic enamel shapes 
Star of light stamp set or brushwork alphabet stamp set (for sentiment on either cards)

Hope you all love these cards as much as I do and I'd love to see any of your projects.

If anyone doesn't have a demonstrator and would like a catalogue message me and I'll happily send you out a catalogue FREE.

Happy crafting 
Catch ya later
Steffi xxx

Sunday 11 September 2016

Star of light and wonderful year card


Hey everyone sorry it's been a while since my last post I've been mega busy at work and prepping for my holidays. 
I hope you like this card...here is what you will need to create it...
Whisper white cardstock measuring 11 1/2" x 5 3/4" scored on long side at 5 3/4" to make card Base
Gold card x 2 measuring 4 3/4" x 4 3/4"
Whisper white cardstock x 2 measuring 4 1/2" x 4 1/2"
Star of light stamp set
Wonderful year stamp set
Starlight thinlets
Versamark
Embossing buddy
Gold embossing powder
Gold metallic thread
Gold metallic shapes
Scrap of gold card to cut stars out

Would love to see your take on it, hopefully see some soon.

If you don't have a demonstrator already and would like a stampin up catalogue , just drop me a message on here and I'll gladly send you out a FREE catalogue.

Happy crafting 
Catch ya later
Steph xx

Friday 26 August 2016

Twisted easel/ shaker card


Hi everyone
I hope you are all doing well.
This project is giving you a sneak peek of just a tiny bit of products available in the new Autumn/ Winter Stampin Up catalogue. The products I have mainly used is the Star of light stamp set and matching Starlight thinlet dies. These are available individually or together in a bundle and therefore saving yourself 10%.
I have also used the new Fancy frost sequins and the new Glitter ribbon duo pack.


Materials you will need to recreate this project is as follows:
Sweet Sugarplum cardstock measuring:
8 1/2 x 4 1/4", 4 1/4 x 4 1/4" and a scrap piece (big enough to cut out the outline star die)
Soft Sky cardstock measuring:
4 x 4" x 2 pieces
Whisper White cardstock measuring:
3 3/4 x 3 3/4" x 2 pieces
Sweet Sugarplum ink pad
Soft Sky ink pad
window sheet 3 3/8 x 3 3/8"
Sweet Sugarplum glitter ribbon
Fancy frost sequins
Foam adhesive strips

1. score the large piece of cardstock on the long side at 4 1/4" and fold to create the card base. Then on the front part score diagonally from the bottom left corner to the upper right corner and fold in on itself (this will create the twisted easel part of the card)
2. Attach the piece of Sweet sugarplum (4 1/4" x 4 1/4") to the front piece of the card base...only applying adhesive to the bottom half of the diagonal scoreline.
3. Next using a piece of whisper white use the outline star die to cut into the middle of the card,attach the window sheet to the inside to create the window, then do the same on the scrap piece of sweet sugarplum...fussy cut around the edge to create a frame and attach to the outside of the cut out.
4. using the cluster of 3 stars and one of the smaller stars from the stamp set, also both ink pads. Stamp a pattern around the star cut on on whisper white and also around the edges of the other piece of whisper white.
5. put the foam adhesive strips around the edge of the star (inner side) and put a pinch of the sequins inside. Take a piece of the soft sky card and carefully attach it to the strips. once this is done mat this onto the front panel of the card.
6. Mat the remaining pieces of soft sky and whisper white card onto the inner card base and using the smallest star die and co ordinating stamp attach to base part of card using a dimensional to form a stopper to keep the twisted easel standing once open
7. Lastly using the ribbon make a bow and attach to front of the card.

I hope you like this project as much as I do and hope you have fun creating it.

If anyone would like a FREE annual or autumn/ winter catalogue either leave a comment on here or contact by email (wild.kat@hotmail.co.uk)

I hope to post another blog soon....happy crafting!!

Steffi xxx

Sunday 21 August 2016

Sunshine sayings and layering love card


Hi everyone Hope you have had a lovely weekend. Most of yesterday for me was spent shipping..oops. Finally found a beautiful unit to store all my stampin up goodies. Today I've been at work.
Anyway I love this card I've made which is strange for me as I'm normally my own worst critic haha.

Supplies you will need to recreate this:
Crumb cake cardstock 1 piece measuring 11 3/4" x 5 7/8" and 2nd piece 2 7/8" x 2 1/4"
Very vanilla cardstock 2 pieces measuring 
5 5/8" x 4 3/4" and 1 piece 2 3/4" x 2"
Sunshine sayings stamp set
Layering love stamp set
Crumb cake ink pad
Blushing bride ink pad
Versamark
Gold embossing powder
Embossing buddy
Natural twine 
Button (I used a retired one from my stash)

1st score the biggest piece of crumb cake card at 5 7/8" then fold to create the Base. Attach one of the large very vanilla pieces to the inside of the card.
Using the stamps from sunshine sayings stamp onto the other large piece of very vanilla. Then put a little bit of snail or fuse on the back to wrap around your twine then attach it to the front of the card. I attached the button using a dimensional.
Next take the embossing buddy and wipe over the small piece of very vanilla and stamp the 'enjoy the little things' using the versamark. Sprinkle gold embossing powder over and use heat tool to set. Then mat this onto the piece of crumb cake and adhered to the front of card with dimensionals. 

I hope you all like this pretty card.
Happy crafting and I'll try and get back soon.
Steffi xxx

Sunday 14 August 2016

Easel card using floral phrases bundle


Hi everyone 
Hope you are all keeping well. Today's make is this easel card made using floral phrases stamp set and matching thinlets.
You will need:
Cherry cobbler cardstock measuring 10" x 5" score at 5" and 2.5" on long side
Cherry cobbler cardstock measuring 5 x 5"
Very vanilla cardstock measuring 4 3/4" x 4 3/4" x 2 and 1 at 4 3/4" x 2"
Cherry cobbler ink pad 
Dimensional
1st fold the large piece on the score lines then layer one of the pieces of very vanilla on the inside to create a matt.
Then using the smallest of the floral thinlets I positioned it on the 2nd piece of very vanilla and die cut this out. Next I stamped the sentiment and hearts onto this. 
Then on the small piece of very vanilla I die cut out the same die as before and adhered it to some spare cherry cobbler. Then attach this panel to the Base of the card using dimensionals this creates the stopper once card is open. 
Last I stamped the floral image onto a scrap piece of card and then fussy cut around it, then attached it to card using dimensionals.

Hope you like what you see.  Thanks for looking.
Happy crafting and catch ya later
Steffi xx


Wednesday 10 August 2016

Waterfall card

Hi everyone sorry I've been missing for quite a while. I've been full of busy with work and then last weekend I was poorly 😢. Anyway back to full health now and thought I'd do a project to share with you all.

This is my take on a waterfall card....so pretty and quite easy to do.
Above is a picture of the cardstock and dsp measurements that you will need to make the card like mine. I also used the items below...
Black ink pad
Lots of love stamp set
Garden in bloom stamp set
Project life corner rounder
1/8" handheld circle punch
Tombow multipurpose glue
and a bit of ribbon.

Take the panel of dsp and attach to the white panel of card, then I took the 1" x 4 1/4" panel of card and attached it to the top of the previous panel about 3/4 of the way down ( I used a couple of brads from my stash to attach it) now you can attach this panel to the Base card.
Next stamp your desired images onto the white squares of card and then attach these using tombow to the black squares. 
Using the 2" x 9" strip of card, score at the measurements shown in above picture. You then attach each of the layered squares placing each one just under each score line. 
Lastly I punched a hole in bottom of the strip we have just done and threaded some ribbon through to activate the waterfall feature.

Hope you like this project and hope to be back soon.
Happy crafting
Steffi xxx


Wednesday 13 July 2016

Pop of pink stepper box


Hi everyone I've just finished making this project and I'm so happy with how it turned out.
I got the inspiration from Debbie Henderson and then I adapted the design to what I wanted.
See the pic below for measurements of cardstock and dsp.

First take the largest piece of cardstock and attach the 10 panels of dsp between each of the score lines on both sides of the cardstock. This will be the basis of our box.
The next instructions will be the same for the 7 x 7 cardstock and the 4 pieces of 6 x 6.
On the back of the card draw a line from corner to corner to form an 'x'. Then staring at one corner fold the point up to the centre of the cross, then holding this in place fold it over again until it's flush with centre line. ( see pics below) 

Next at one corner cut up 2 squares either side of the 2 small triangles and repeat on opposite side. 

It should look like the above pic. Next I used tombow to glue pieces together. On opposite corner to where we cut, put glue on two triangles and row of squares and then lift up to form a wall then fold glued panels down on itself see pic below.


Once that's all done you can now attach the rest of dsp. The 2 x 2 pieces are liners to go inside the drawers (made from 6 x 6 card) then the 2 1/4 squared piece is for top of the lid. The 4 tiny pieces of dsp are for the front of the drawers.
On the 1st piece of cardstock that we done, line up one of the drawers on the 2nd panel from the left at the bottom of that panel. I then position a drawer on the very last panel at the top. It's then easier to place the 2 in between. I used strong red tape to attach these.
I stamped 4 of the flamingos from pop of paradise stamp set on white cardstock in versamark and heat embossed in gold, then fussy cut these out and attach to panels that you will see once box is closed up. I also stamped the hello image from same stamp set and embossed with gold powder and attached to lid of box with a dimensional. Finally use some gold ribbon to toe around the box lid.
Hope you like what you see and any questions feel free to email me.
Catch ya later
Steffi xxx


Wednesday 29 June 2016


Hi everyone sorry it's been a while since my last post, things been really busy. I received my SU order today and just had to use some of it.
Here is my take on a gift card holder. I CASED this from dawn's stamping thoughts. Net.
What you will need
Smokey slate cardstock 1st piece measuring 11" by 4 1/4 2nd piece 5 " by 3 3/4" 3rd piece 4 1/2 by 2 3/4" 4th piece 3 3/4" by 2 1/4 "
A little foxy dsp measuring 5 1/4 by 4" and 3 pieces measuring 4" by 2 1/2"
Calypso coral scrap cardstock
Fox builder punch
Smokey slate ink pad
Thoughtful banners stamp set and punch

Take the 11 by 4 1/4" card and score on the long side at 5 1/2" and fold in front and then back. Adhere the biggest piece of dsp to the inside of the base card and then the next biggest piece of cardstock to this.
Next using the 4 1/2 by 2 3/4 cardstock Adhere a piece of the remaining dsp and then mat the last piece of cardstock to this. The remaining 2 pieces of dsp will Adhere to the front and back of the small flap we created. Before sticking the piece to the inside panel use a circle punch to notch a semi circle. Only put adhesive on the 3 sides, this allows the gift card to be inserted.
Lastly use stamps to decorate and use the foxy builder punch to create the fox. Then using thoughtful banners stamp set I stamped a banner and sentiment in smokey slate and punched it out using the dual banner punch.
Hope you find this useful and I'll try and get back soon.
Catch ya later
Steffi xxx